|


At the last minute I
decided to combine a lacquer-based gloss
coat over the Future Floor Finish coats I
used working with the dry-transfers. No
rhyme or reason here. I masked off the
tracks and running gear before doing so, as
I wanted to keep the metallic sheen on the
track shoes during weathering the lower
portion of the model. Sometimes the lacquer
coats change the appearance of the metallic
paints - causing them to look rather like -
paint. I haven't tried Future to protect a
metallic paint before, and didn't want to
experiment at this late stage of completing
the model. I'd practice on some scrap
plastic instead.
The paper masks to protect
the tracks and running gear is nothing more
that extended skirts made from paper. A
quick and cheap expedient that does the job.
I'm sure it goes without saying that you get
better coverage by treating the Turret
separate of the Hull when applying gloss or
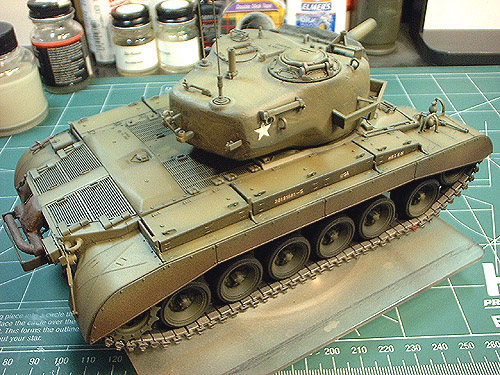
dull coats. Note the markings on the glacis
plate - the layers of Future Floor Finish,
though thin, have been built up and over the
thickness of the dry-transfers. When the
dull cote goes on, these dry-transfers will
appear like they've been painted on the
model. You can even spray a light coat of
lacquer Gloss Cote over the acrylic Future
once you've let it set - just like any other
acrylic-based finish. I let the Future setup
at least 8 hours before doing this, and have
never encountered a problem. Pictured here
is the end result of a combination of Future
work with the decals, and an overall coat of
lacquer Gloss.
|
It's
too bad that by July 1955, all of the
remaining M45 Pershings in US Army inventory
had been converted into M46 Patton Medium
Tanks. The M45 Pershing would have looked
nice in a semi-gloss finish, like some US
tank crews maintained their mounts during
the Cold War 1950's. Future doesn't take a
long time to setup, but I let my model sit
for several hours anyway. It lays down so
smooth and thin, if the shine wasn't
present, you wouldn't know it's there at
all. I wish they produced a Future 'flat"
Finish.
Though
it still looks glossy, I sprayed a thinned
and light coat of lacquer Dull Cote all over
the model. This gives a seat for the pastels
to hold onto. I do it this way to keep the
overall thickness of the paint down. As I go
through layers of weathering, I apply thin
mists of Dull Cote between each session.
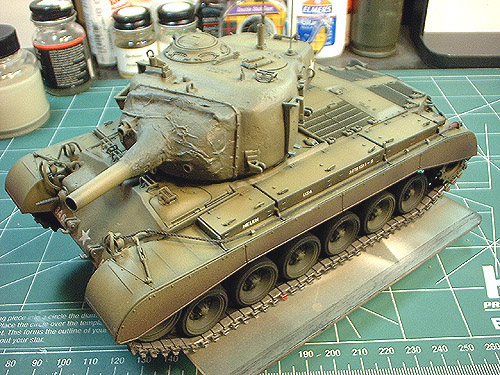
Here, I have brought out details by
selective dry pastel applications to
contours and crevices on my tank model. This
is very light use of black and brown pastel
colors and adds subtle depth to specific
areas of the miniature. It best calls
attention to the areas of the model that
naturally reflect the most light - by
slightly deepening the shadows. The tonal
differences between colors were done with
the airbrush beforehand, and the inaccurate
technique of drybrushing is not necessary
here. The pastels are softer than a "wash"
technique, and as such appear different in
other lighting conditions - like shadows
would. The changes in the next three photos
are very subtle - more apparent in different
lighting conditions. These effects are more
like filters for the tones underneath.
I
sprayed the underside and running gear of my
miniature with Tamiya XF-57 and oversprayed
with my home-brewed "Grimy Track Mixture"
(equal parts of Tamiya XF-1 Flat Black,
XF-10 Flat Brown, X-19 Smoke, and XF-69 NATO
Black - the whole thinned 50% with Lacquer
Thinner and applied at a low airbrush
setting of 16 PSI). This, coupled with
painting the lower hull and running gear a
darker color than the upper portions of the
model, aided in weathering effects. Before
moving on, I'd seal the model one more time
- with another home-brewed concoction I call
"Dust Cote".
The
Dust Cote both flattens the sheen on the
model and lays down a really thin layer of
"dust" where applied - if you were reduced
in size to 1:35th scale, this would look
like a tank that had been run down the road
for awhile. My Dust Cote is made from 10
drops of color (equal parts of Tamiya XF-57
Buff and XF-19 Sky Grey) mixed into Lacquer
Dull Cote - one to one and one-half ounces.
I thin the whole mixture 50% with Lacquer
Thinner. My digital camera might not convey
the way the filter layer changes the tone of
the colors underneath very well - but your
eye will register it quite clearly when you
apply the technique. Compare the last three
photos here with the Turret Photo at the top
of this page to see the difference. The more
times you do this - the more the effect
becomes pronounced. It stops being a filter
for the color tones underneath and becomes
another paint color layer. For replicating a
worn wintercoat, like for a M46 "Tiger"
Patton in the late winter/early spring in
Korea, this would be a good use of the
filter. Replace the Buff with Flat White -
the Sky Grey will prevent the mix from being
too intense of a white, and apply multiple
coats over the tank model's basic finish.
I
decided to go easy on the worn paint and
areas of rust - again wanting to render a
well-maintained vehicle. Though it was
service in the opening of the Korean War,
not a lot of this vehicle's use is recorded
through to the end of the war. I believe
they were used to support the M4A3E8 105mm
Howitzer Close Support Tanks in the indirect
fire role most of the time. Lots of crew use
would be likely present, but little in the
way of "battle damage" a vehicle would get
in direct fire missions. I thus chose to
model full fenders and skirts too - as these
are a quick indicator of how much use and
abuse a tank in the field can get due to
their thin sheet metal construction. To rust
and paint chip the heck out of my miniature
with a nice and new-looking set of fenders
and skirts would look odd to say the least.
The
worn paint I opted to apply is located
around areas of heaviest use, and rendered
with Tamiya XF-69 NATO Black. Minor rust
streaks are done with brown and orange
pastels, and from the distance I'm shooting
the picture of the model, should be barely
visible. Below, the right side showing worn
and chipped paint - the left side hasn't
been done yet.

|