|


Inside the large kit box,
you get separately bagged clear parts and 14
principal kit parts cast in soft, grey
plastic. My kit had no ejector pin marks to
contend with in visible areas, no warping or
flashing present. If you rushed, you could
probably assemble this kit in five minutes.
There are no decals -
totally leaving it up to your imagination on
how to finish it. The Instruction Sheet is
simple, exploded-view diagrams demonstrating
how to put the kit together. Most
experienced modelers will simply blow past
this and dive into the kit - like I did.


You get an option for
landed or in-flight configurations with a
nice choice of Landing Gear Doors. The
Landing Gear Legs themselves called for
the most effort in cleanup, with some
slight mold slip affecting three out of
four of them to address. It really didn't
take a long period of time to sand true.

The Landing Gear are
beefy and rugged, securely and tightly
fitting into their sockets on the lower
hull. The kit easily can support more than
its own weight, and ensuring all the pads
touch the display surface properly is no
challenge.
|

The
seven clear, neon green-type "windows" and
"dome" just snap into place on molded-in
pegs on the underside of the upper hull -
leaving no gaps to worry about, and a clean
outer appearance. I only filled around the
upper inside edges with a 50/50 mix of White
Glue and Tamiya XF-1 Flat Black of the
"windows" as a light blocker.
The
two hull halves are smoothly cast with
deeply engraved and simple details - but I
think appropriate for the subject. The kit
will call for some masking later on if you
follow the suggested finishing scheme - but
this is simple to do with Tamiya Masking
Tape. My kit had some sinkholes on the upper
hull where the heavy locating pins are cast.
I filled them with Squadron Green Putty and
wet sanded the area(s) smooth before
painting.
Building
& Finishing - the 1:72 scale miniature
comes to life with a simple addition in
lighting. The interior is huge - perfect for
setting up a lighting kit. What I did was as
simple as I could come up with, and
inexpensive as well.
The
tight fit between the upper and lower hulls
allows you to take it apart, and squeeze it
back together again, if you enlarge the
female locating pins cast into the upper
hull. My favorite cheap lighting kits come
from Darice Inc., typically I get these at
my local Hobby Shop or Michael's Craft
Stores.
This
kit is #1100-68, and is a x3 AA-Battery
powered set of 10 steady burning, clear,
super bright LED's. My local retail was
$4.99 for the set. They are advertised for a
30-hour battery life - much more than I need
for my usual practice. You can turn them on
before a contest display, and let them go
for the duration of the event.
I have
powered-up photos and unpowered photos at
the left. I think the little bit of internal
lighting gives the miniature a little extra
life. The green clear parts are unaltered,
but you could frost their interiors with a
blast of Dullcote to further reduce their
transparency. I thought they were perfect as
they come.
Even
with the Darice Lighting Kit inside, there
is quite a bit of extra room left over for a
modeler wanting to add some visual interest
like a control room and 1:72 scale EBE's
(Extra-Terrestrial Biological Entities)
inside - or perhaps US Military Personnel.
I
painted the interiors of the hull halves
Tamiya Acrylic XF-1 Flat Black, before
adding the "window" and "dome" inserts. I
went ahead and light-blocked the edges of
the "windows" too before proceeding, along
the upper edges.

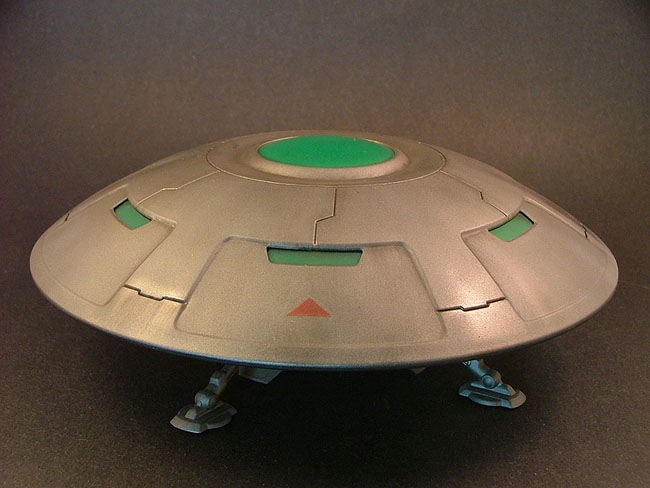
I mixed up a 50/50 custom
color using Tamiya Acrylic XF-16 Flat
Aluminum with XF-1 Flat Black to give me a
type of oxidized aluminum finish.

Then, I followed Pegasus
Hobbies' suggested finishing instructions
and masked off the three upper hull
sections with Tamiya Masking Tape. I
didn't, however, paint these sections,
instead choosing to take a small amount of
SNJ Model Products' Aluminum Polishing
Powder and rubbed it into the Tamiya paint
finish. This gives a slightly contrasting
panel finish - without going way
overboard. With my soft cloth buffer that
I used on these panels, I went over random
sections of both hull halves to arrive at
the finish shown at left.
The little red triangle
(Trilateral) marking is trimmed from red
decal sheet, and placed into position.
I airbrushed random
streaks and "burns" with a diluted (50%)
mixture of Tamiya X-19 Smoke. I added
depth to the panel lines with a wash of
MiG Productions #P220 Dark Wash, and then
increased the shadows in certain corners
with applications of Bragdon Enterprises
#F65 Soot Pigments. As this finish comes
out a bit satiny after using MiG
Productions' Wash, I went back over these
sections, and other random areas with
Polly Scale #F404106 Flat acrylic paint.
The resulting finish is durable and can be
handled.


References &
Acknowledgements - there are none! Who the
heck has reference material on this
subject? I wish I could boast that I did,
but I think that would take away from how
cool it finishes up. I could make up
something, but I don't think that would
make the model kit anymore interesting
than it already is. It sells itself once
you peek into the kit box.
I went out to get a
couple more of them to try out different
scheme and lighting ideas for the future
when I finished this one.
I really like the stance
and profile of the Pegasus Hobbies model
kit. It just looks "right", and sort of
purposeful. What appears to be an
egress/ingress Hatch is located on the
lower hull - but you don't get the option
to pose it open. That would probably goad
the modeler into crafting an interior,
wouldn't it? The irised main hatch on the
bottom of the lower hull is an intriguing
feature too - perhaps a point for bringing
up reluctant cattle and humanoids on the
fly?
There are no decals
provided in the kit, as I mentioned above,
but I decided to add some interest in my
miniature by trimming out a simple red
triangle (rumored to be on all-black
aircraft frequenting situations where UFO
activity has been or is in the process of
unfolding) to place on my ship. I claim no
knowledge further of the significance of
the red triangle - you decide if it
represents an Alien Government, or a
Terrestrial one. I think this kit would
look good in several schemes, and with an
option for "red-neon" windows and dome it
would be great.
Even if you only have a
passing fancy in UFO's, I'd recommend you
not pass this kit up. It is a very good
one for indulging one's fantasies, or
getting introduced to how good a UFO model
kit could be.
|